

网络文件共享服务NFS
1.1 NFS工作流程

===NFS网络文件系统存在的意义:实现数据共享,数据保持一致===

NFS:Network File System 网络文件系统,基于内核的文件系统。Sun 公司开发,通过使用 NFS,用户和程序可以像访问本地文件一样访问远端系统上的文件,基于RPC(Remote Procedure Call Protocol 远程过程调用)实现。
NFS主要功能是通过局域网网络让不同的主机系统之间可以共享文件或者目录。⭐️⭐️⭐️⭐️⭐️
NFS可以解决前端web静态资源共享
NFS可以解决前端web静态资源一致性
NFS可以解决前端web磁盘空间浪费
由于NFS服务提供网络共享文件,并不能解决访问web资源的延时文件
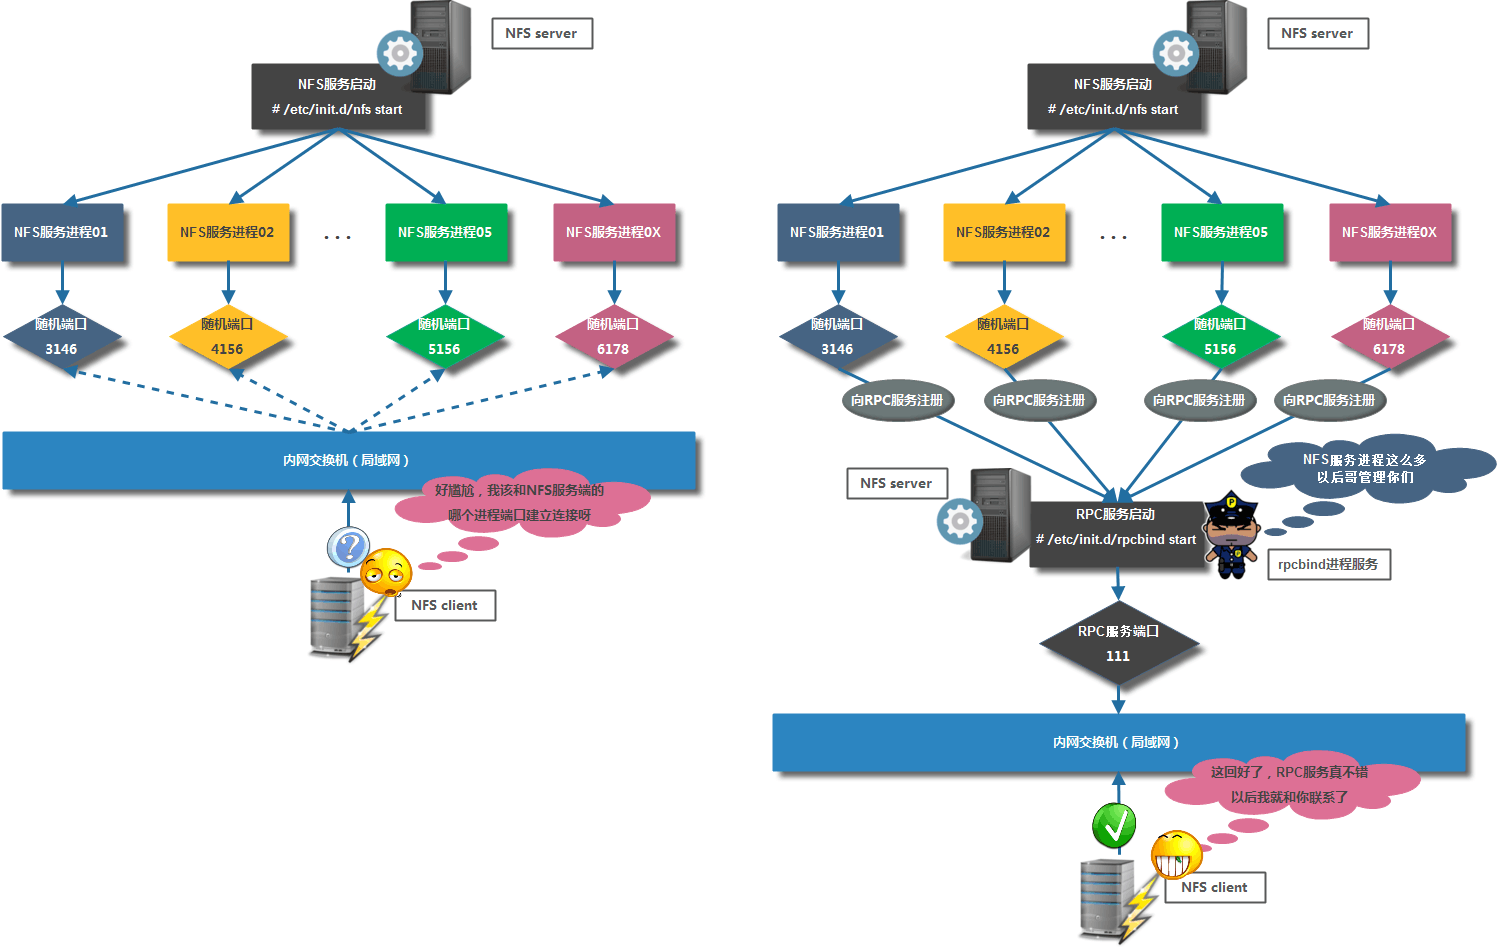
RPC采用C/S模式,客户机请求程序调用进程发送一个有进程参数的调用信息到服务进程,然后等待应答信息。在服务器端,进程保持睡眠状态直到调用信息到达为止。当一个调用信息到达,服务器获得进程参数,计算结果,发送答复信息,然后等待下一个调用信息,最后,客户端调用进程接收答复信息,获得进程结果,然后调用执行继续进行。
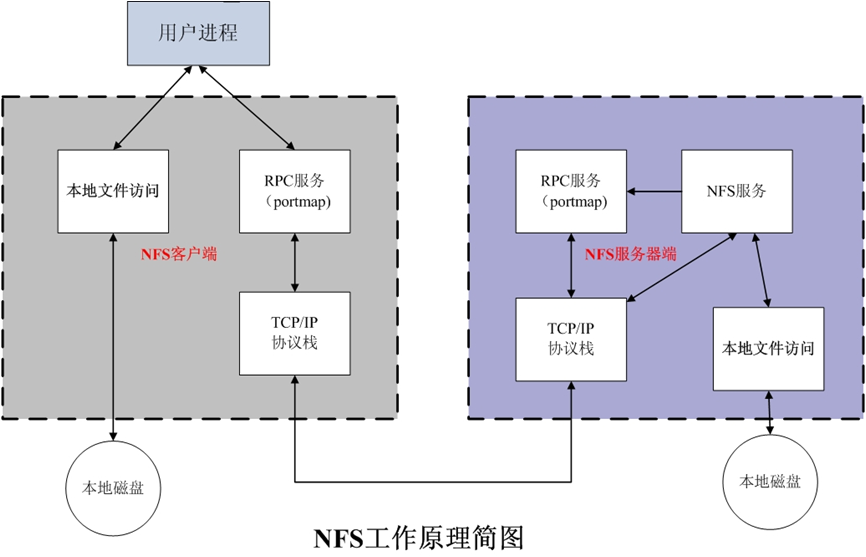
===RPC服务工作原理===
NFS优势:节省本地存储空间,将常用的数据,如:/home目录,存放在NFS服务器上且可以通过网络访问,本地终端将可减少自身存储空间的使用。
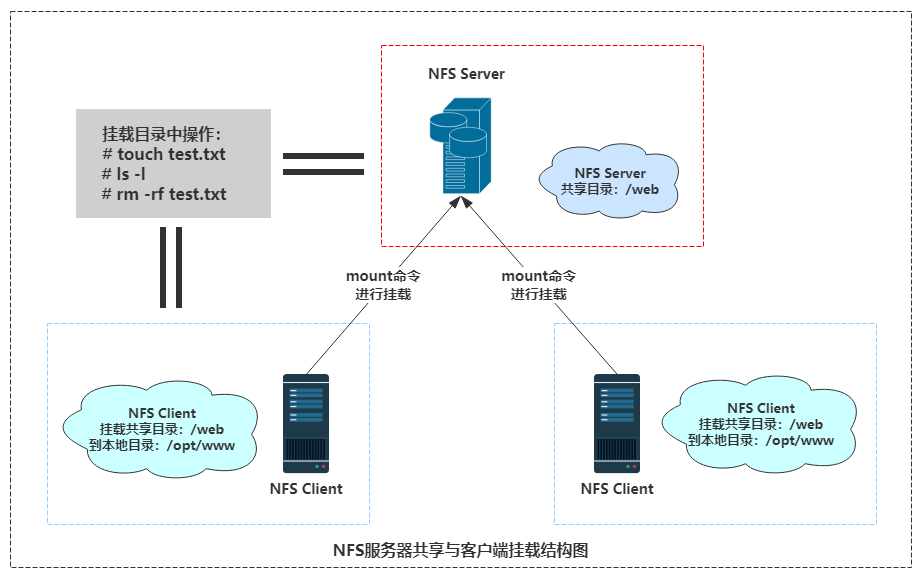
NFS网络文件系统工作方式:
在nfs服务器端创建共享目录
通过mount网络挂载,将NFS服务端共享目录挂载到NFS客户端本地目录
NFS客户端在挂载目录上创建、删除、查看数据等操作,等价于在服务端进行的创建、删除、查看数据等操作。
1.2 NFS软件介绍
软件包:
红帽系统: nfs-utils: 包括服务器和客户端相关工具,CentOS8 最小化安装时默认没有安装
Ubuntu: nfs-server(nfs-kernel-server) 服务器包名,nfs-common 客户端包名
相关软件包:rpcbind(必须),tcp_wrappers
Kernel支持:nfs.ko
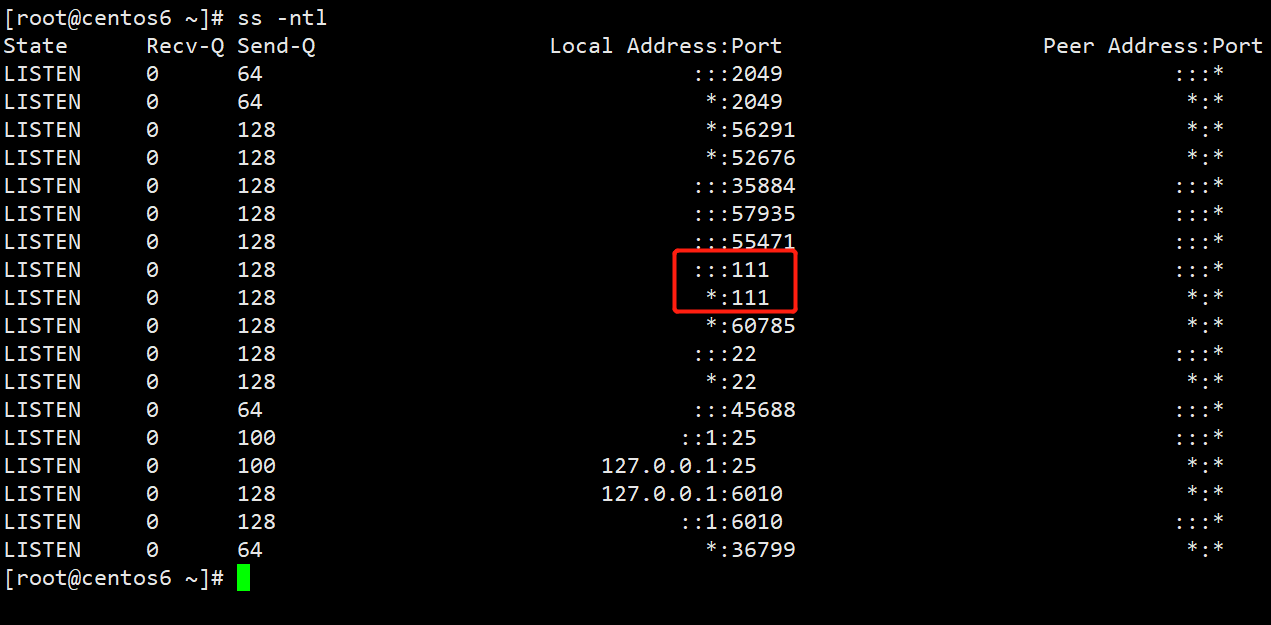
端口:2049(nfsd), 其它端口由portmap(111)分配
NFS服务主要进程:
rpc.nfsd 最主要的NFS进程,管理客户端是否可登录
rpc.mountd 挂载和卸载NFS文件系统,包括权限管理
rpc.lockd 非必要,管理文件锁,避免同时写出错
rpc.statd 非必要,检查文件一致性,可修复文件
说明:CentOS 6 开始portmap进程由rpcbind代替
日志:/var/lib/nfs/
NFS配置文件:
/etc/exports
/etc/exports.d/*.exports
CentOS6 安装 NFS
[root@centos6 ~]# yum install nfs-utils rpcbind -y
[root@centos6 ~]# rpm -ql nfs-utils
[root@centos6 ~]# chkconfig --list rpcbind
rpcbind 0:关闭 1:关闭 2:启用 3:启用 4:启用 5:启用 6:关闭
# 启动失败是因为未启动 rpcbind 服务,centos7和8可以自动解决启动依赖关系
[root@centos6 ~]# service nfs start
启动 NFS 服务: [确定]
启动 NFS mountd: [失败]
启动 NFS 守护进程:rpc.nfsd: writing fd to kernel failed: errno 111 (Connection refused)
rpc.nfsd: unable to set any sockets for nfsd
[失败]
[root@centos6 ~]# service rpcbind start
正在启动 rpcbind: [确定]
[root@centos6 ~]# service nfs start
启动 NFS 服务: [确定]
启动 NFS mountd: [确定]
启动 NFS 守护进程: [确定]
[root@centos6 ~]# service nfs status
rpc.svcgssd 已停
rpc.mountd (pid 28469) 正在运行...
nfsd (pid 28485 28484 28483 28482 28481 28480 28479 28478) 正在运行...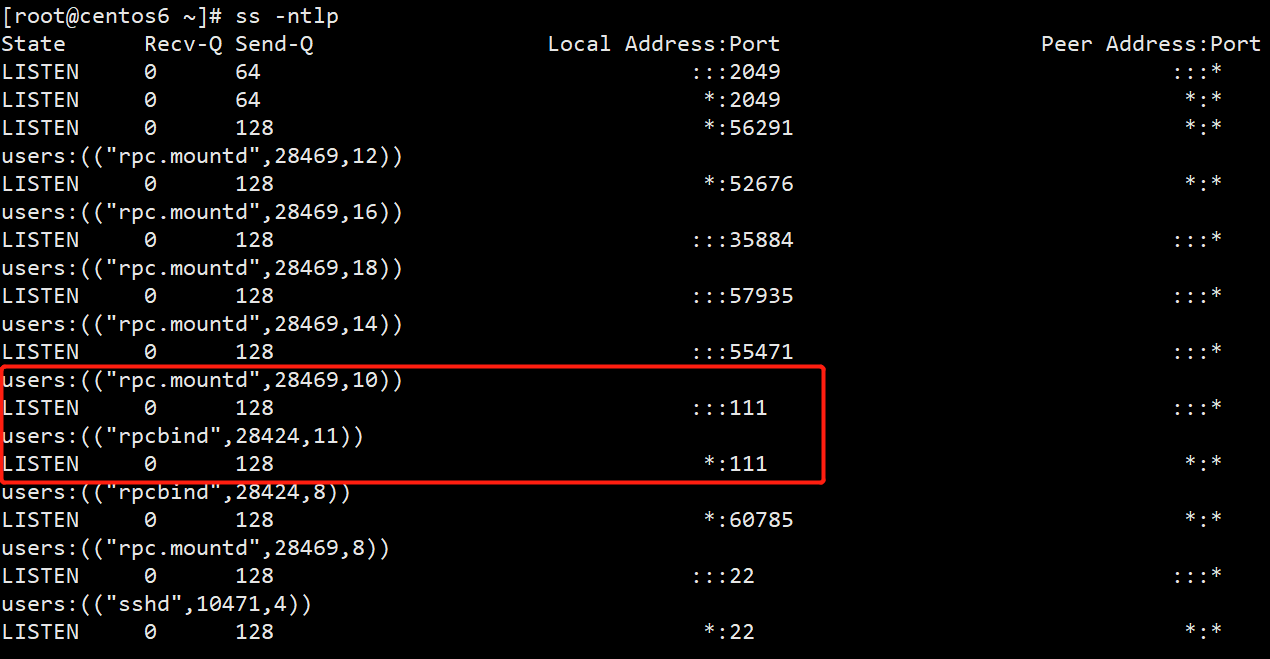
CentOS7 安装 NFS
[root@nfs-server ~]# yum install nfs-utils -y
# Centos7 启动方式
[root@nfs-server ~]# systemctl enable --now nfs
Created symlink from /etc/systemd/system/multi-user.target.wants/nfs-server.service to /usr/lib/systemd/system/nfs-server.service.
# Centos8 启动方式
# systemctl enable --now nfs-server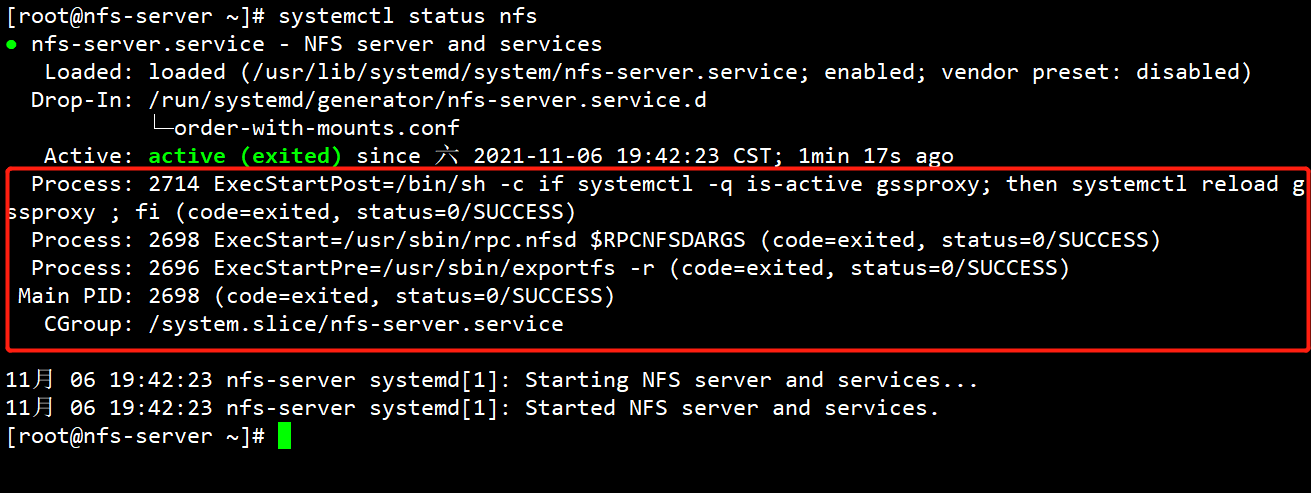
# 启动后查看端口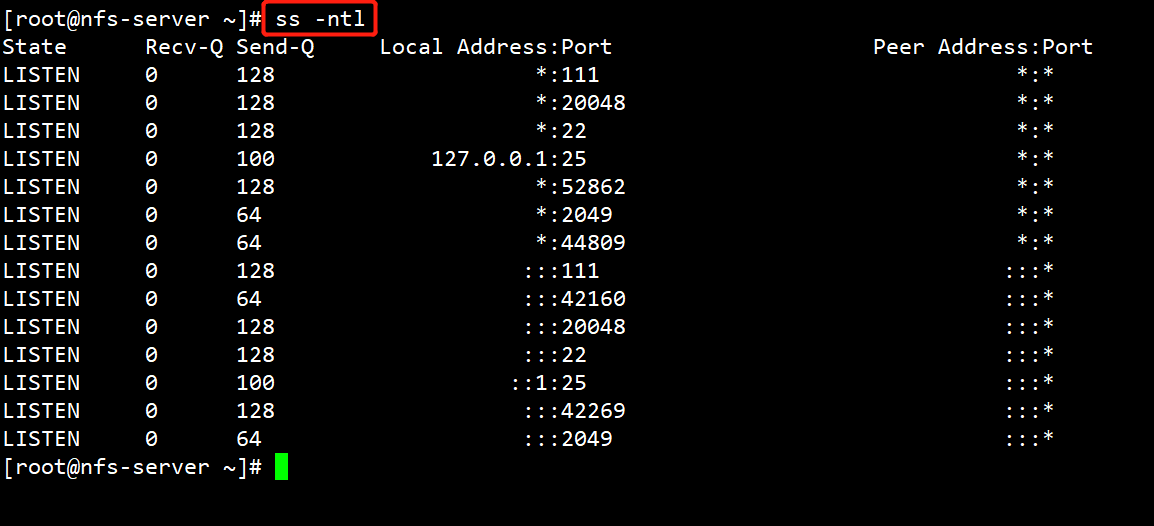
# 停止 nfs 服务,再次查看端口
[root@nfs-server ~]# systemctl stop nfs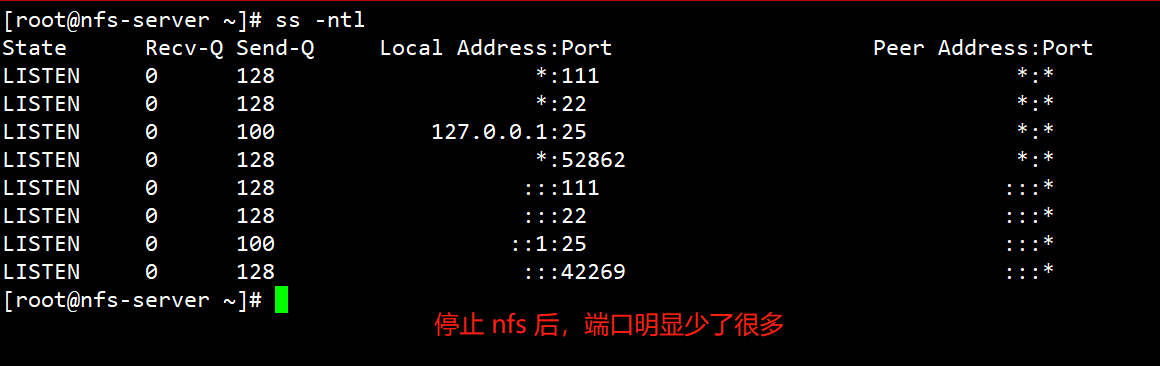
# NFS 是一个内核级的文件系统
# 查看 NFS 内核模块
[root@nfs-server ~]# modinfo nfs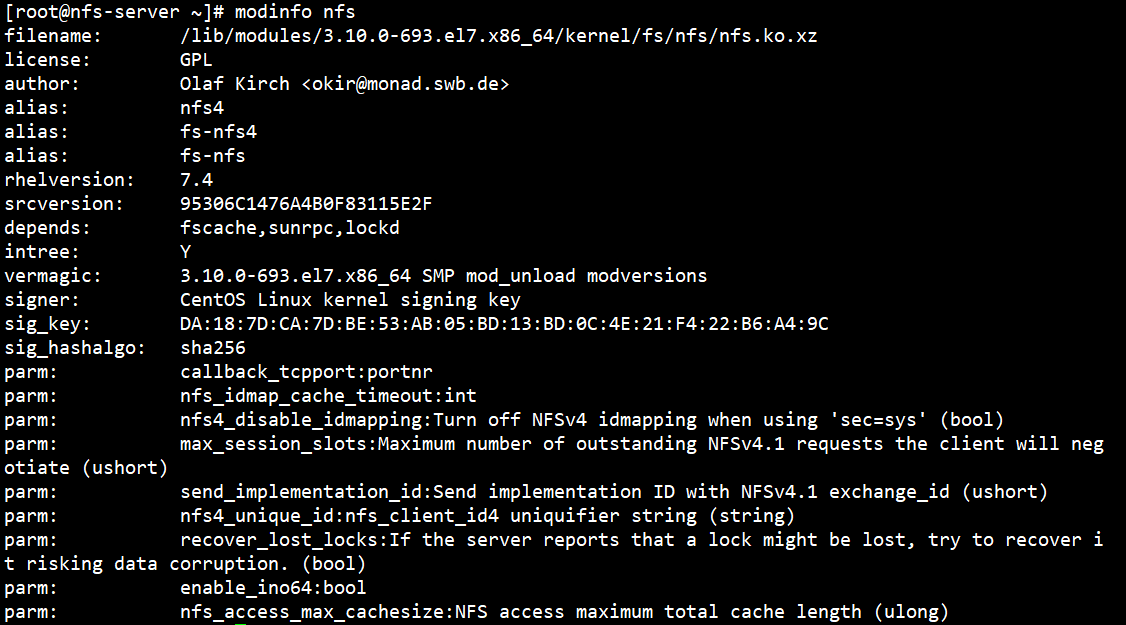
# 查看目前所有支持的文件系统
[root@nfs-server ~]# ls /lib/modules/3.10.0-693.el7.x86_64/kernel/fs
[root@nfs-server ~]# ll /etc/exports
-rw-r--r--. 1 root root 11 10月 20 15:40 /etc/exports
[root@nfs-server ~]# mkdir -p /data/nfsdir{1,2}
[root@nfs-server ~]# tree /data/
/data/
├── nfsdir1
└── nfsdir2
2 directories, 0 files
[root@nfs-server ~]# touch /data/nfsdir1/a.txt
[root@nfs-server ~]# touch /data/nfsdir2/b.txtRocky8 安装 NFS
[root@rocky8 ~]# yum list | grep ^nfs*
nftables.x86_64 1:0.9.3-25.el8 @anaconda
nfs-utils.x86_64 1:2.3.3-59.el8 baseos
nfs4-acl-tools.x86_64 0.3.5-3.el8 baseos
nftables.i686 1:1.0.4-4.el8 baseos
nftables.x86_64 1:1.0.4-4.el8 baseos
[root@rocky8 ~]# yum -y install nfs-utils -y
[root@rocky8 ~]# rpm -ql nfs-utils
[root@rocky8 ~]# systemctl start nfs-server
[root@rocky8 ~]# ss -ntl | grep 2049
LISTEN 0 64 0.0.0.0:2049 0.0.0.0:*
LISTEN 0 64 [::]:2049 [::]:*
#查看支持的NFS版本,注意:只有服务启动才能看此文件
[root@rocky8 ~]# cat /proc/fs/nfsd/versions
-2 +3 +4 +4.1 +4.2Ubuntu2204 安装 NFS
[root@ubuntu2204 ~]#apt update && apt -y install nfs-kernel-server
[root@ubuntu2204 ~]#systemctl status nfs-server
[root@ubuntu2204 ~]#systemctl start nfs-server
#查看支持的NFS版本,注意:只有服务启动才能看此文件
[root@ubuntu2204 ~]#cat /proc/fs/nfsd/versions
-2 +3 +4 +4.1 +4.2
#客户端工具
[root@ubuntu2204 ~]#apt -y install nfs-common 1.3 NFS共享配置文件
/dir 主机1(opt1,opt2) 主机2(opt1,opt2)...
格式说明:
以#开始的行,为注释
主机格式:
anonymous:表示使用通配所有客户端

单个主机:ipv4,ipv6,FQDN

IP networks:两种掩码格式均支持

172.18.0.0/255.255.0.0

172.18.0.0/16

wildcards:主机名通配,例如:.test.com,IP不可以

netgroups:NIS域的主机组,@group_name
每个条目指定目录导出到的哪些主机,及相关的权限和选项
默认选项:(ro,sync,root_squash,no_all_squash)
ro,rw              #只读和读写
async              #异步,数据变化后不立即写磁盘,先写入到缓冲区中,过一段时间再写入磁盘,性能高,安全性低
sync(1.0.0后为默认)#同步,数据在请求时立即写入共享存储磁盘,性能低,安全性高
root_squash        #(默认)远程root映射为nfsnobody,UID为65534,CentOS8 为nobody,CentOS 7以前的版本为nfsnobody
no_root_squash     #远程root映射成NFS服务器的root用户
all_squash         #所有远程用户(包括root)都变成nfsnobody,CentOS8 为nobody
no_all_squash      #(默认)保留共享文件的UID和GID
anonuid和anongid   #指明匿名用户映射为特定用户UID和组GID,而非nobody,可配合all_squash使用
范例:NFS配置示例
# vim /etc/exports
/myshare server.example.com
/myshare *.example.com
/myshare server?.example.com
/myshare server[0-20].example.com
/myshare 172.25.13.10
/myshare 173.25.0.0/16
/myshare 2000:472:18:b51:c32:a21
/myshare 2000:472:18:b51::/64
/myshare *.example.com 172.28.0.0/16
/myshare desktop.example.com(ro)
/myshare desktop.example.com(ro) server[0-20].example.com(rw)
/myshare diskless.example.com(rw,no_root_squash)
[root@nfs-server ~]# vim /etc/exports
/data/nfsdir1 *
[root@nfs-server ~]# systemctl stop firewalld
[root@nfs-server ~]# setenforce 0
[root@nfs-server ~]# systemctl start nfs
# 查看当前有哪些共享
[root@nfs-server ~]# exportfs -v
# 可以通过重启服务来使改动的配置生效,但是不建议,建议采用以下重新加载配置生效,使其生效
[root@nfs-server ~]# exportfs -r
exportfs: No options for /data/nfsdir1 *: suggest *(sync) to avoid warning
[root@nfs-server ~]# exportfs -v
/data/nfsdir1 <world>(sync,wdelay,hide,no_subtree_check,sec=sys,ro,secure,root_squash,no_all_squash)
# 在远程客户端查看共享
[root@nfs-client ~]# yum -y install nfs-utils
# 在客户端查看远程主机的nfs共享列表
[root@nfs-client ~]# showmount -e 192.168.2.11
Export list for 192.168.2.11:
/data/nfsdir1 *
[root@nfs-client ~]# mount 192.168.2.11:/data/nfsdir1 /mnt/nfs1
[root@nfs-client ~]# ls /mnt/nfs1/
a.txt
[root@nfs-client ~]# df -h | grep nfs1
192.168.2.11:/data/nfsdir1 26G 1.2G 25G 5% /mnt/nfs1
# nfs服务端拷贝一个文件
[root@nfs-server ~]# cp /etc/fstab /data/nfsdir1/aa.txt
# 客户端再次查看
[root@nfs-client ~]# ll /mnt/nfs1/
总用量 4
-rw-r--r-- 1 root root 501 11月 6 20:16 aa.txt
-rw-r--r-- 1 root root 0 11月 6 19:59 a.txt
[root@nfs-client ~]# cat /mnt/nfs1/aa.txt
#
# /etc/fstab
# Created by anaconda on Mon Oct 18 21:15:48 2021
#
# Accessible filesystems, by reference, are maintained under '/dev/disk'
# See man pages fstab(5), findfs(8), mount(8) and/or blkid(8) for more info
#
UUID=121b7047-1255-438c-956e-c6118787df36 / xfs defaults 0 0
UUID=9466f144-1056-43d6-aaa4-5205567ea66b /boot xfs defaults 0 0
UUID=08d5cbac-23cb-4121-aaee-309688e55af8 swap swap defaults 0 0
# 当前可以读,但是不可以写文件
[root@nfs-client ~]# touch /mnt/nfs1/bb.txt
touch: 无法创建"/mnt/nfs1/bb.txt": 只读文件系统
# 客户端查看虽然是读写但是服务端并不是的
[root@nfs-client ~]# mount | grep nfs1
192.168.2.11:/data/nfsdir1 on /mnt//=nfs1 type nfs4 (rw,relatime,vers=4.1,rsize=524288,wsize=524288,namlen=255,hard,proto=tcp,timeo=600,retrans=2,sec=sys,clientaddr=192.168.2.6,local_lock=none,addr=192.168.2.11)
# 服务端查看挂载,可以看到是只读
[root@nfs-server ~]# exportfs -v
/data/nfsdir1 <world>(sync,wdelay,hide,no_subtree_check,sec=sys,ro,secure,root_squash,no_all_squash)
[root@nfs-server ~]# vim /etc/exports
# 这里默认是只读的 /data/nfsdir1 *(ro)
/data/nfsdir1 *
# 现在在服务端配置可写
[root@nfs-server ~]# vim /etc/exports
/data/nfsdir1 *(rw)
# 使配置生效
[root@nfs-server ~]# exportfs -r
[root@nfs-server ~]# exportfs -v
/data/nfsdir1 <world>(sync,wdelay,hide,no_subtree_check,sec=sys,rw,secure,root_squash,no_all_squash)
# 在远程客户端写文件,发现还是不行,但是报错不同了
[root@nfs-client ~]# touch /mnt/nfs1/bb.txt
touch: 无法创建"/mnt/nfs1/bb.txt": 权限不够
# 只要跨网络访问,两个地方的权限要打开,服务自身权限和文件系统权限
[root@nfs-server ~]# chmod 777 /data/nfsdir1/
# 在远程客户端写文件
[root@nfs-client ~]# touch /mnt/nfs1/bb.txt
[root@nfs-client ~]# ll /mnt/nfs1/
总用量 4
-rw-r--r-- 1 root root 501 11月 6 20:16 aa.txt
-rw-r--r-- 1 root root 0 11月 6 19:59 a.txt
-rw-r--r-- 1 nfsnobody nfsnobody 0 11月 6 20:25 bb.txt
# 现在可以发现远程 root 写文件使用的是 nfsnobody 用户(centos8系统上是 nobody 用户),那么下面在服务端准确赋予权限
[root@nfs-server ~]# chmod 755 /data/nfsdir1/
[root@nfs-server ~]# setfacl -m u:nfsnobody:rwx /data/nfsdir1/
# 再次在远程客户端写文件
[root@nfs-client ~]# touch /mnt/nfs1/cc.txt
[root@nfs-client ~]# ll /mnt/nfs1/
总用量 4
-rw-r--r-- 1 root root 501 11月 6 20:16 aa.txt
-rw-r--r-- 1 root root 0 11月 6 19:59 a.txt
-rw-r--r-- 1 nfsnobody nfsnobody 0 11月 6 20:25 bb.txt
-rw-r--r-- 1 nfsnobody nfsnobody 0 11月 6 20:29 cc.txt
# root_squash(压榨) 也就是说远程 root 用户在 nfs 映射为 nfsnobody 用户,权限压缩
[root@nfs-server ~]# exportfs -v
/data/nfsdir1 <world>(sync,wdelay,hide,no_subtree_check,sec=sys,rw,secure,root_squash,no_all_squash)
# 在客户端使用普通用户写文件测试,看是否 "压榨"
[root@nfs-client ~]# useradd test
[root@nfs-client ~]# echo 1 | passwd --stdin test
[test@nfs-client root]$ touch /mnt/nfs1/dd.txt
touch: 无法创建"/mnt/nfs1/dd.txt": 权限不够
# 服务端开启权限
[root@nfs-server ~]# chmod 777 /data/nfsdir1
# 在客户端使用普通用户写文件测试
[test@nfs-client root]$ touch /mnt/nfs1/dd.txt
[test@nfs-client root]$ ll /mnt/nfs1/dd.txt
-rw-rw-r-- 1 test test 0 11月 6 20:35 /mnt/nfs1/dd.txt
# 在服务端查看权限 ,发现普通用户不会改变,只针对超管
[root@nfs-server ~]# ll /data/nfsdir1/
总用量 4
-rw-r--r--. 1 root root 501 11月 6 20:16 aa.txt
-rw-r--r--. 1 root root 0 11月 6 19:59 a.txt
-rw-r--r--. 1 nfsnobody nfsnobody 0 11月 6 20:25 bb.txt
-rw-r--r--. 1 nfsnobody nfsnobody 0 11月 6 20:29 cc.txt
-rw-rw-r--. 1 1000 1000 0 11月 6 20:35 dd.txt
# 服务端配置 远程客户端 root 用户权限不改变
[root@nfs-server ~]# chmod 755 /data/nfsdir1/
[root@nfs-server ~]# setfacl -b /data/nfsdir1/
[root@nfs-server ~]# vim /etc/exports
/data/nfsdir1 *(rw,no_root_squash)
[root@nfs-server ~]# exportfs -r
[root@nfs-server ~]# exportfs -v
/data/nfsdir1 <world>(sync,wdelay,hide,no_subtree_check,sec=sys,rw,secure,no_root_squash,no_all_squash)
[root@nfs-client ~]# touch /mnt/nfs1/test.txt
# 服务端查看
[root@nfs-server ~]# ll /data/nfsdir1/test.txt
-rw-r--r--. 1 root root 0 11月 6 20:44 /data/nfsdir1/test.txt
# 当然,客户端也有权限把文件全部删除
[root@nfs-client ~]# rm -rf /mnt/nfs1/*
# 配置全部"压榨" all_squash
[root@nfs-server ~]# vim /etc/exports
/data/nfsdir1 *(rw,no_root_squash,all_squash)
[root@nfs-server ~]# exportfs -r
[root@nfs-server ~]# exportfs -v
/data/nfsdir1 <world>(sync,wdelay,hide,no_subtree_check,sec=sys,rw,secure,no_root_squash,all_squash)
[root@nfs-server ~]# chmod 777 /data/nfsdir1/
# 客户端使用普通用户写文件
[test@nfs-client root]$ touch /mnt/nfs1/1.txt
# 服务端查看
[root@nfs-server ~]# ll /data/nfsdir1/1.txt
-rw-rw-r--. 1 nfsnobody nfsnobody 0 11月 6 20:49 /data/nfsdir1/1.txt
# 配置 all_squash 后 root 和普通用户全部“压榨”
[root@nfs-client ~]# touch /mnt/nfs1/root.txt
# 服务端查看
[root@nfs-server ~]# ll /data/nfsdir1/root.txt
-rw-r--r--. 1 nfsnobody nfsnobody 0 11月 6 20:51 /data/nfsdir1/root.txt
# 这个期间会出现一个问题,我们知道系统里面靠 ID号来进行用户的识别,看下面一个例子
# 服务端创建一个账号
[root@nfs-server ~]# useradd -u 1000 demo
[root@nfs-server ~]# id demo
uid=1000(demo) gid=1000(demo) 组=1000(demo)
[root@nfs-server ~]# vim /etc/exports
/data/nfsdir1 *(rw,no_root_squash)
[root@nfs-server ~]# exportfs -r
[root@nfs-server ~]# exportfs -v
/data/nfsdir1 <world>(sync,wdelay,hide,no_subtree_check,sec=sys,rw,secure,no_root_squash,no_all_squash)
# 客户端也有一个id是1000的账号
[root@nfs-client ~]# id test
uid=1000(test) gid=1000(test) 组=1000(test)
[root@nfs-client ~]# su test
[test@nfs-client root]$ touch /mnt/nfs1/test.txt
# nfs服务端查看,发现账号变成了 demo ,错乱了
[root@nfs-server ~]# ll /data/nfsdir1/
总用量 0
-rw-rw-r--. 1 nfsnobody nfsnobody 0 11月 6 20:49 1.txt
-rw-r--r--. 1 nfsnobody nfsnobody 0 11月 6 20:51 root.txt
-rw-rw-r--. 1 demo demo 0 11月 6 21:00 test.txt
# anonuid和anongid 指明匿名用户映射为特定用户UID和组GID,而非nobody,可配合all_squash使用
[root@nfs-server ~]# groupadd -g 66 nfspro
[root@nfs-server ~]# useradd -u 66 -g nfspro nfspro
[root@nfs-server ~]# id nfspro
uid=66(nfspro) gid=66(nfspro) 组=66(nfspro)
[root@nfs-server ~]# vim /etc/exports
/data/nfsdir1 *(rw,no_root_squash,all_squash,anonuid=66,anongid=66)
[root@nfs-server ~]# chmod 777 /data/nfsdir1/
[root@nfs-server ~]# exportfs -v
/data/nfsdir1 <world>(sync,wdelay,hide,no_subtree_check,anonuid=66,anongid=66,sec=sys,rw,secure,no_root_squash,all_squash)
# 客户端写文件测试用户是不是 nfspro
[root@nfs-client ~]# su test
[test@nfs-client root]$ touch /mnt/nfs1/11.txt
[root@nfs-client ~]# touch /mnt/nfs1/22.txt
# nfs服务端查看
[root@nfs-server ~]# ll /data/nfsdir1/
总用量 0
-rw-rw-r--. 1 nfspro nfspro 0 11月 6 21:09 11.txt
-rw-rw-r--. 1 nfsnobody nfsnobody 0 11月 6 20:49 1.txt
-rw-r--r--. 1 nfspro nfspro 0 11月 6 21:10 22.txt
-rw-r--r--. 1 nfsnobody nfsnobody 0 11月 6 20:51 root.txt
-rw-rw-r--. 1 demo demo 0 11月 6 21:00 test.txt
# 指定主机有读写权限
[root@nfs-server ~]# vim /etc/exports
/data/nfsdir1 *(ro,no_root_squash) 192.168.2.6(rw)
[root@nfs-server ~]# exportfs -r
[root@nfs-server ~]# exportfs -v
/data/nfsdir1 192.168.2.6(sync,wdelay,hide,no_subtree_check,sec=sys,rw,secure,root_squash,no_all_squash)
/data/nfsdir1 <world>(sync,wdelay,hide,no_subtree_check,sec=sys,ro,secure,no_root_squash,no_all_squash)
[root@nfs-server ~]# chmod 777 /data/nfsdir1/
# 客户端01进行写文件测试
[root@nfs-client ~]# touch /mnt/nfs1/11.txt
# 写入永久挂载
[root@nfs-client ~]# vim /etc/fstab
192.168.2.11:/data/nfsdir1 /mnt/nfs1 nfs _netdev 0 0
[root@nfs-client ~]# mount -a
# 服务端查看
[root@nfs-server ~]# ll /data/nfsdir1/
总用量 0
-rw-r--r--. 1 nfsnobody nfsnobody 0 11月 6 21:24 11.txt
# 客户端02进行写文件测试
[root@centos6 ~]# showmount -e 192.168.2.11
Export list for 192.168.2.11:
/data/nfsdir1 (everyone)
[root@centos6 ~]# mkdir /mnt/nfs1
[root@centos6 ~]# mount 192.168.2.11:/data/nfsdir1 /mnt/nfs1
[root@centos6 ~]# touch /mnt/nfs1/22.txt
touch: 无法创建"/mnt/nfs1/22.txt": 只读文件系统
# 在 nfs 服务器再共享一个目录
[root@nfs-server ~]# vim /etc/exports.d/test.exports
/data/nfsdir2 *(rw)
[root@nfs-server ~]# exportfs -r
[root@nfs-server ~]# exportfs -v
/data/nfsdir1 192.168.2.6(sync,wdelay,hide,no_subtree_check,sec=sys,rw,secure,root_squash,no_all_squash)
/data/nfsdir1 <world>(sync,wdelay,hide,no_subtree_check,sec=sys,ro,secure,no_root_squash,no_all_squash)
/data/nfsdir2 <world>(sync,wdelay,hide,no_subtree_check,sec=sys,rw,secure,root_squash,no_all_squash)1.4 NFS工具
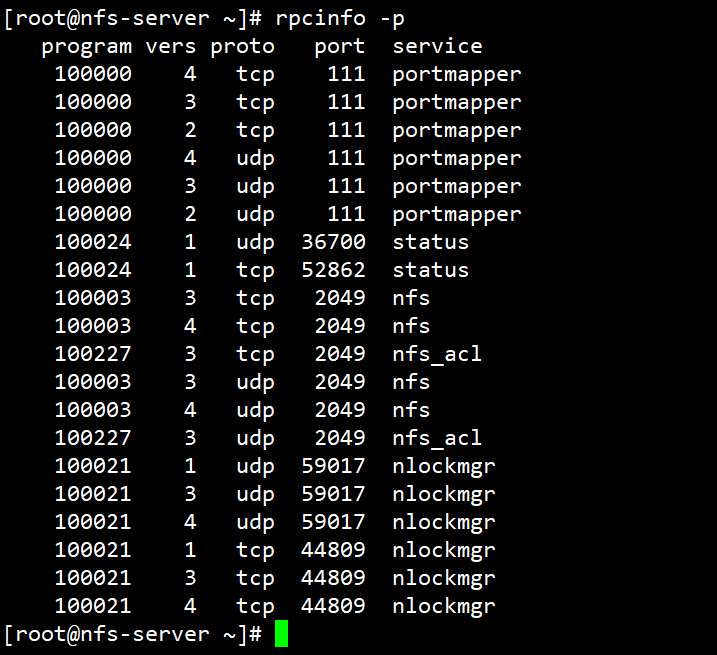
1.4.1 rpcinfo
rpcinfo 工具可以查看RPC相关信息
查看注册在指定主机的RPC程序
[root@nfs-client ~]# rpcinfo -p 192.168.2.11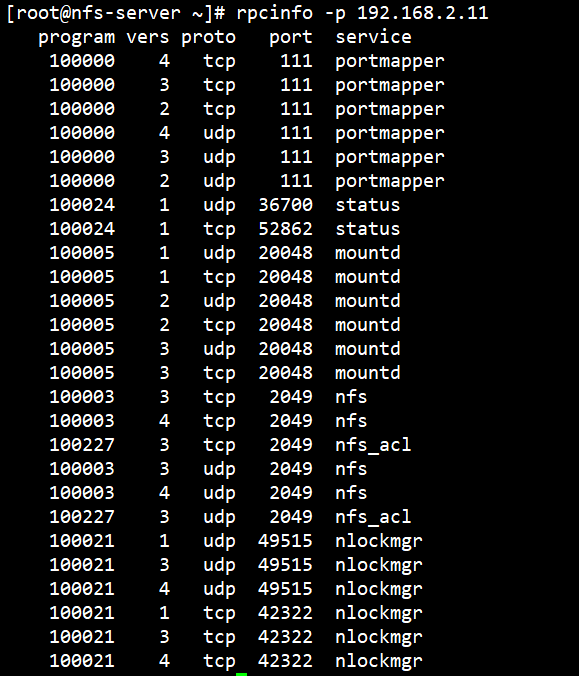
查看RPC注册程序
[root@nfs-client ~]# rpcinfo -s 192.168.2.11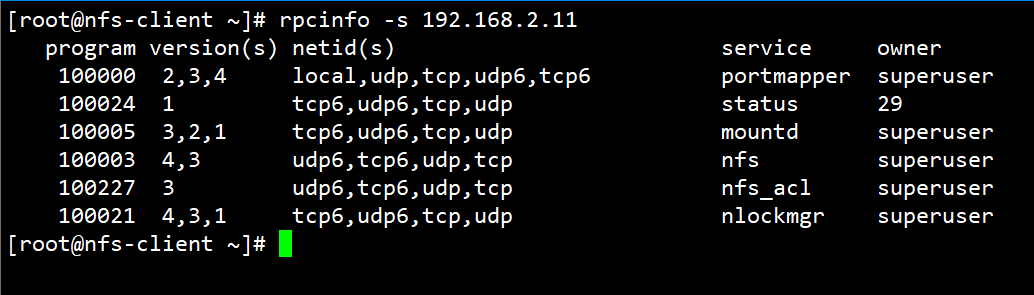
# 查看远程主机
[root@nfs-client ~]# rpcinfo -p 192.168.2.12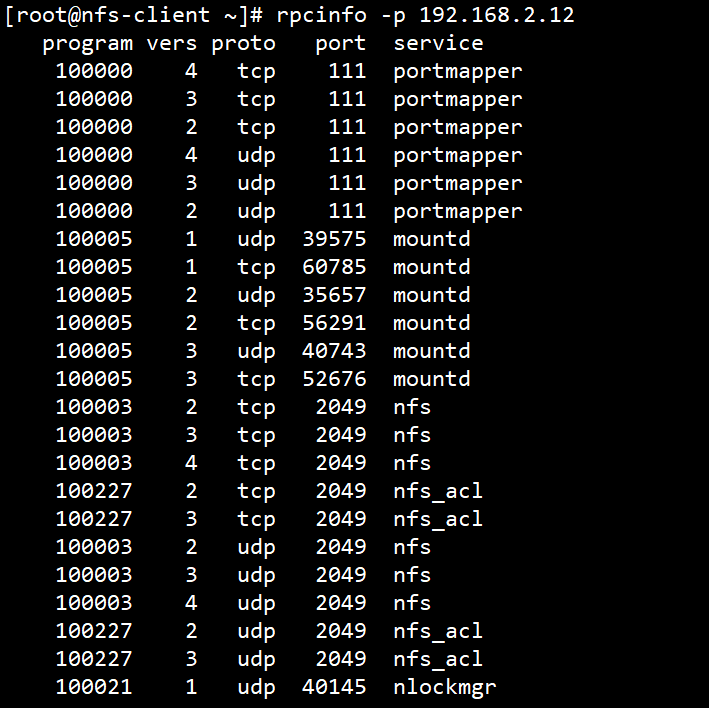
1.4.2 exportfs
exportfs:可用于管理NFS导出的文件系统
常见选项:
-v  #查看本机所有NFS共享
-r  #重读配置文件,并共享目录
-a  #输出本机所有共享
-au  #停止本机所有共享
1.4.3 showmount
常见用法:
# 查看远程主机的NFS共享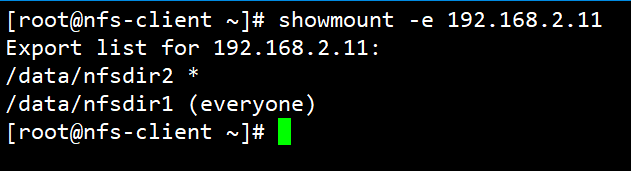
1.4.4 mount.nfs
客户端NFS挂载
NFS相关的挂载选项:man 5 nfs
fg       #(默认)前台挂载
bg       #后台挂载
hard     #(默认)持续请求
soft     #非持续请求
intr     #和hard配合,请求可中断
rsize    #和wsize 一次读和写数据最大字节数,rsize=32768
_netdev  #无网络服务时不挂载NFS资源
vers     #指定版本,客户端centos8默认4.2 ,centos7默认4.1 centos6默认4.0
提示:基于安全考虑,建议使用 nosuid,netdev,noexec 挂载选项
临时挂载NFS共享:
mount -o rw,nosuid,fg,hard,intr 172.16.0.1:/testdir /mnt/nfs/范例
[root@centos7 ~]#mkdir /mnt/nfs
[root@centos7 ~]#mount 192.168.2.11:/data/nfs1 /mnt/nfs
[root@centos7 ~]#ls /mnt/nfs
index.html
[root@centos7 ~]#df -T /mnt/nfs
Filesystem               Type 1K-blocks   Used Available Use% Mounted on
192.168.2.11:/data/nfs1 nfs4  5240200 39833  5200464   1% /mnt/nfs
范例:开机挂载
vim /etc/fstab
192.168.2.11:/public   /mnt/nfs   nfs   defaults,_netdev  0  0
范例: 远程的 root 映射为NFS服务器的nobody用户
[root@centos6 ~]#grep nobody /etc/passwd
nobody:x:99:99:Nobody:/:/sbin/nologin
nfsnobody:x:65534:65534:Anonymous NFS User:/var/lib/nfs:/sbin/nologin
[root@centos7 ~]#grep nobody /etc/passwd
nobody:x:99:99:Nobody:/:/sbin/nologin
nfsnobody:x:65534:65534:Anonymous NFS User:/var/lib/nfs:/sbin/nologin
[root@centos8 ~]#grep nobody /etc/passwd
nobody:x:65534:65534:Kernel Overflow User:/:/sbin/nologin1.5 自动挂载⭐️⭐️⭐️⭐️⭐️
可使用 autofs 服务按需要挂载外围设备,NFS共享等,并在空闲5分钟后后自动卸载
1.5.1 相关包和文件
软件包:autofs
服务文件:/usr/lib/systemd/system/autofs.service
配置文件:/etc/auto.master
autofs工具简单使用
#安装autofs工具
[root@rhel82 ~]# yum install -y autofs
#启动autofs服务
[root@rhel82 ~]# systemctl start autofs
#autofs服务启动后会有/misc/cd目录,设置虚拟机连接光盘,实现自动挂载系统光盘
[root@rhel82 ~]# ll /misc/
总用量 0
[root@rhel82 ~]# cd /misc/cd
[root@rhel82 cd]# df -h
文件系统 容量 已用 可用 已用% 挂载点
devtmpfs 1.9G 0 1.9G 0% /dev
tmpfs 2.0G 0 2.0G 0% /dev/shm
tmpfs 2.0G 10M 2.0G 1% /run
tmpfs 2.0G 0 2.0G 0% /sys/fs/cgroup
/dev/nvme0n1p5 25G 4.4G 21G 18% /
/dev/nvme0n1p2 1014M 208M 807M 21% /boot
tmpfs 392M 1.2M 391M 1% /run/user/42
tmpfs 392M 4.6M 387M 2% /run/user/0
/dev/sr0 7.9G 7.9G 0 100% /misc/cd
[root@rhel82 ~]# rpm -ql autofs
[root@rhel82 ~]# rpm -qc autofs1.5.2 配置文件格式
参看帮助:man 5 autofs
所有导出到网络中的NFS启用特殊匹配 -host 至"browse"
范例:/net目录可以自动挂载NFS共享
cat /etc/auto.master
/net    -hosts
cd /net/192.168.2.11/
自动挂载资源有两种格式:
相对路径法:将mount point 路径分成 dirname 和 basename 分别配置,可能会影响现有的目录结构
绝对路径法:直接匹配全部的绝对路径名称,都写入到指定的配置文件里,不会影响本地目录结构
注意:autofs配置的dirname目录和basename目录不需要手动创建,会覆盖已存在挂载点的dirname目录下原数据
1.5.2.1 相对路径法
autofs主配置文件 /etc/auto.master 格式
挂载点的dirname 指定目录的配置文件路径,如:/etc/test.auto指定目录的配置文件格式
# /etc/test.auto
挂载点的basename    挂载选项     挂载的设备
示例:相对路径法
[root@centos8 ~]#vim /etc/auto.master
/misc /etc/auto.misc
[root@centos8 ~]#vim /etc/auto.misc
cd -fstype=iso9660,ro,nosuid,nodev :/dev/cdrom示例:相对路径法为支持通配符
vim /etc/auto.master
/misc /etc/auto.misc
vim /etc/auto.misc
# 表示/misc下面的子目录和nfs共享/export目录的子目录同名
* server:/export/&范例:利用autofs自动挂载nfs
#服务端和客户端安装nfs-utils工具包
[root@server ~]# yum install -y nfs-utils
[root@client ~]# yum install -y nfs-utils
[root@server ~]# mkdir /nfs
[root@server ~]# cp /etc/passwd /nfs/
#centos6系统nfs服务叫做nfs.service
#centos7系统上nfs.service 和 nfs-server.service同一个服务
#centos8只有nfs-server.service服务
[root@server ~]# systemctl start nfs
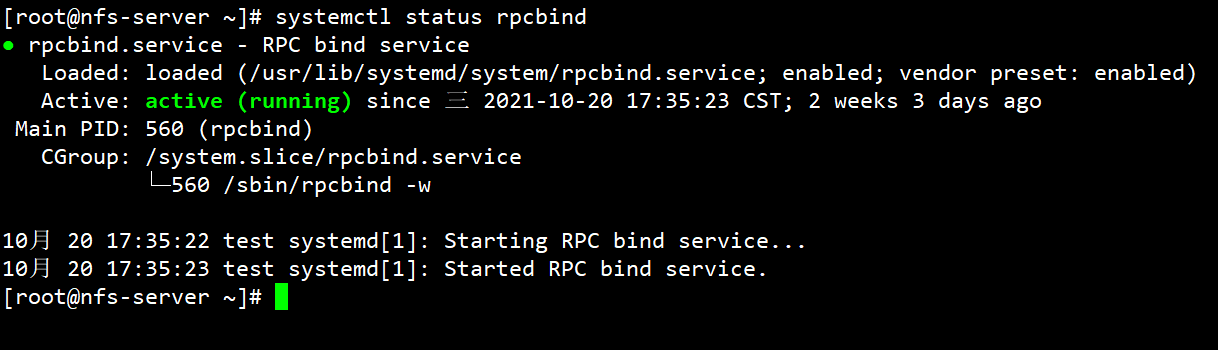
#centos7系统可以解决服务之间依赖关系,并且nfs服务启动会自动启动rpcbind.service
[root@server ~]# systemctl status rpcbind
[root@server ~]# vim /etc/exports
/nfs *(rw)
[root@server ~]# exportfs -r
[root@server ~]# exportfs -v
/nfs <world>(sync,wdelay,hide,no_subtree_check,sec=sys,rw,root_squash,no_all_squash)
[root@server ~]# systemctl restart nfs
[root@server ~]# showmount -e 192.168.192.128
Export list for 192.168.192.128:
/nfs *
[root@client ~]# showmount -e 192.168.192.128
Export list for 192.168.192.128:
/nfs *
[root@client ~]# mkdir /opt/nfs
[root@client ~]# mount 192.168.192.128:/nfs /opt/nfs/
[root@client ~]# df -h | grep nfs
192.168.192.128:/nfs 62G 1.7G 61G 3% /opt/nfs
#编写autofs主配置文件
[root@client ~]# vim /etc/auto.master
/opt /etc/auto.master.d/auto.nfs
#编写子配置文件
[root@client ~]# vim /etc/auto.master.d/auto.nfs
nfs -fstype=nfs 192.168.192.128:/nfs
#挂载点/dirname是/目录,查看autofs配置未生效,/目录数据
[root@client ~]# cp /root/anaconda-ks.cfg /opt/
[root@client ~]# ll /opt/
总用量 4
-rw-------. 1 root root 1453 12月 5 04:03 anaconda-ks.cfg
#如果修改主配置文件需要重启服务
[root@client ~]# systemctl restart autofs
#一旦重启atuofs服务,挂载dirname目录属于autofs服务管理,源数据不存在
[root@centos8 ~ ]# ll /opt/
total 0
#cd进入指定挂载点,autofs就会自动挂载
[root@client ~]# ls /opt/
[root@client ~]# cd /opt/nfs
[root@client nfs]# ls
passwd
[root@client nfs]# df -h | grep nfs
192.168.192.128:/nfs 62G 1.7G 61G 3% /opt/nfs1.5.2.2 绝对路径法
/etc/auto.master 格式
/- 指定配置文件路径指定配置文件格式
挂载点完整的绝对路径 挂载选项 挂载设备范例:绝对路径法
vim /etc/auto.master:
/- /etc/auto.direct
vim /etc/auto.direct:
/foo -fstype=nfs server1:/export/foo
/user/local/ -fstype=nfs,vers=3 server1:/usr/local
/mnt/cdrom -fstype=iso9660 :/dev/cdrom范例:
[root@client ~]# vim /etc/auto.master
/- /etc/auto.master.d/auto.nfs
[root@client ~]# vim /etc/auto.master.d/auto.nfs
/opt/nfs -fstype=nfs 192.168.192.128:/nfs
#autofs服务使用绝对路径自动挂载,不会覆盖原数据
[root@client ~]# systemctl start autofs
[root@client ~]# ll /opt/
总用量 4
-rw-------. 1 root root 1453 12月 5 04:03 anaconda-ks.cfg
drwxr-xr-x. 2 root root 20 12月 4 19:39 nfs
[root@client ~]# cd /opt/nfs/
[root@client nfs]# ls
passwd